The 2008 PC Builder's Bible
Find the best parts. Learn to build a rig from scratch and overclock it to kingdom come. PC Gamer shows you how
If you can put together a bed from IKEA, you can build your own PC. Seriously—it’s that easy. In fact, you can probably do it in less time, and with the same screwdriver. But while few people curl into the fetal position at the thought of snapping together some Swedish furniture, lots of folks are intimidated by the prospect of putting together their own PCs. That’s too bad, because you can begin with a pile of components in the morning and be playing Unreal Tournament 3 on your new gaming rig the same afternoon.
That’s not to say that PC-building is for everybody. You do miss out, for instance, on having a single point of contact for technical support. Then again, technical support can be as unhelpful as it is unintelligible, and building your own PC means that you get to call the shots on every component, from the motherboard to the sound system. You pay only for the parts you want, and you decide what kind of upgrade path to leave for yourself in the future.
Still, building a PC can be nerve-wracking if you’ve never done it before, or if the last videocard you installed went in the AGP slot. No worries: in this super-comprehensive guide to building your own PC—you might even call it the “Ultimate” guide—We’ll show you how to put a PC together, with a lot of “show” and a minimum of yap. We’ll even explain how to benchmark your PC to make sure it’s performing up to spec, and give you my favorite and most reliable tweaking tips, whether you’re running Windows XP or Windows Vista. We’ll admit – putting a PC together can be difficult. But then, so is constructing your own bed, if you don’t have someone to help you select the right parts and show you how they go together. Lucky for you, you do!
Prices and Parts list
CASE
Coolermaster Cosmos 1000 $200
MOTHERBOARD
NVIDIA nForce 780i $250
CPU
Intel Q9300 2.5GHz Quad-Core $270
RAM
2GB Corsair PC8500 DDR 2 $100
VIDEO CARD
NVIDIA GeForce 9800GTX $300
POWER SUPPLY
Antec TruePower Quattro 850 Watt $200
CPU FAN
Zalman 9700NT $65
HARD DRIVE
Western Digital 500GB SE16 SATA $90
OPTICAL DRIVE
Lite-On 20X SATA DVD R/W $25
TOTAL $1500
(Optional):
MEDIA READER
Sabrent 65-in-1 Flash Card Reader $14
SOUND CARD
Creative X-Fi XtremeGamer $130
BLU-RAY
SONY BD-ROM BDU-X10S $199
ADD. HARD DRIVES
WD 10,000 RPM 150GB Raptor SATA $175
Seagate 7200.11 1TB SATA $220
Step 1
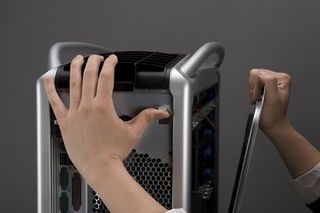
Remove the side panel of your case. This is particularly easy with a case like the CoolerMaster Cosmos 1000, which has a lever on both sides of the chassis that releases the side panels when lifted. This can save you a great deal of aggravation if you frequently need to get inside your case to exchange parts or perform upgrades. If using another model, we suggest purchasing thumbscrews that let you unscrew the side panels without using a screwdriver.
Step 2
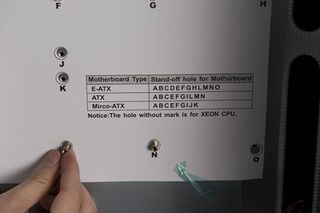
Screw in the motherboard stands. Your case purchase should include a bundle of screws packed in the box. Find the narrow screw stands that need to be affixed to the interior case platform. With motherboards based on the ATX spec (the current design standard), 10 stands need to be screwed in. The Cosmos case includes a handy reference sheet to let you know where the screws go. Putting a screw stand in the wrong slot could short out your motherboard!
Step 3a
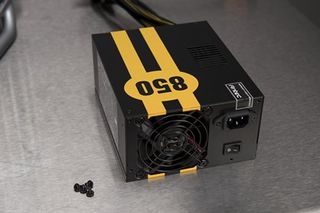
Time to install the power supply. Take the power supply out of the box and unravel its cables. Our power supply is modular, so we only use the cables that we actually need to power our internal devices. Find the included set of screws in the power supply box. These will be different from the ones included with your case.
Sign up to the 12DOVE Newsletter
Weekly digests, tales from the communities you love, and more
Step 3b
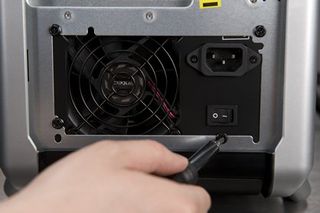
Screw in your power supply. Make sure all the screws are tight so the power supply can’t wiggle around inside the case. Four screws will do the trick.
Step 3c
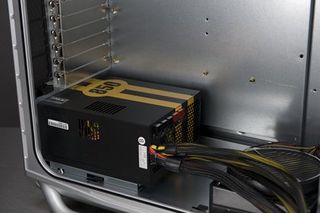
With the power supply mounted, this is how the interior of your system should look right now. Move the cables from permanently attached to the power supply out the way for the next few steps.
Step 4a
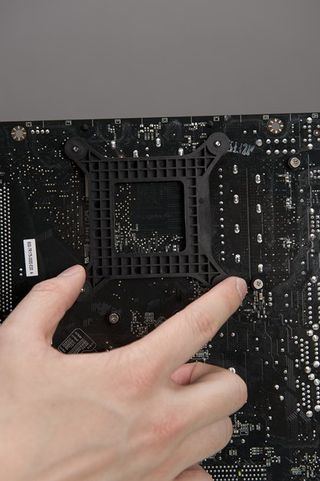
On to the motherboard. We’re going to be using a third-party CPU cooler for this build, which will keep your CPU perfectly chilled for overclocking. The Zalman 9700NT requires that you install a mounting bracket onto the motherboard. To do this, first align the bottom part of the bracket to the underbelly of your mobo. Its four holes should line up with four screw holes surrounding the CPU.
Step 4b
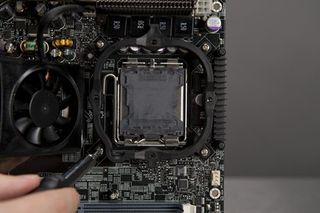
Screw in the top part of the bracket carefully. The corner of the bracket with the extra niche should match the corner on the motherboard where the CPU locking pin rises (bottom left in our photo). Make sure you don’t screw the top bracket in to tightly, or the bottom bracket may lose alignment with the screw holes.
Step 5
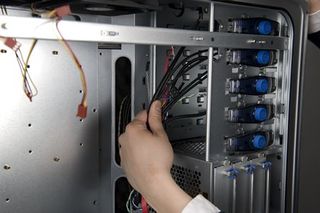
Move the excess cables coming from your case aside. This includes front-panel connectors and eSATA cables. We’ll get to these later. A good place to store them for now is in the optical drive cage, where they can’t get in the way.
Step 6a
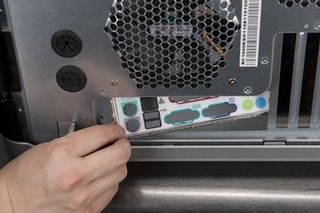
Once last bit of preparation before putting in the motherboard. Remove the generic motherboard back panel port plate from the rear of the case. It should easily pop out if you push it from the outside.
Step 6b
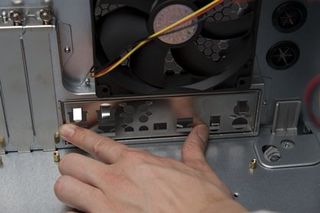
Replace the generic back panel plate with the one included in your motherboard box. Snap it in by pressing its corners against the case from the inside. You should hear a distinct click when each corner is snapped into place.
Step 7
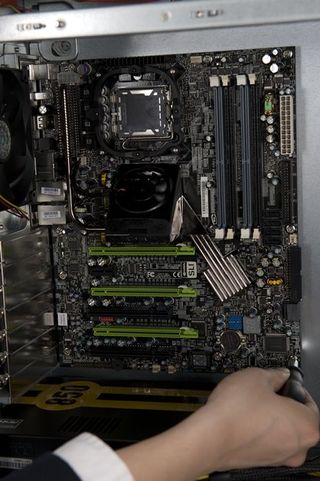
Time to install the motherboard! Carefully place the motherboard into the case cavity, holding it from opposite corners. Angle and slide it in from the front of the case toward the back, so the back panel powers can fi t through the back port plate. Once the motherboard is aligned and correctly situated, screw it in with 10 small screws that were packaged with your case. Don’t go overboard when you tighten the screws – it’s not necessary, and you could crack your mobo if you’re overzealous.
Step 8a
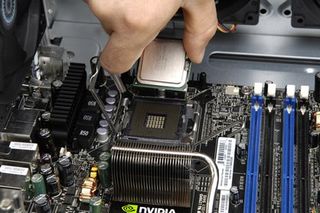
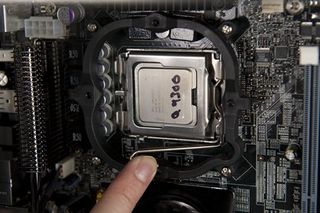
Read your CPU and motherboard instructions carefully to fi nd out how to remove the socket shield and properly align the processor. In this case, our Q9300 has a tiny triangle in one corner that must be aligned with the one corner of the socket that’s missing a metal contact.
Step 8b
Close the socket shield and lock the CPU into place by clamping down on the CPU socket pin.
Step 9a
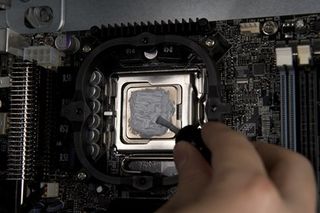
Apply thermal paste to the processor before mounting the CPU fan. The Zalman 9700NT fan includes a small bottle of thermal paste, along with a tiny brush in the cap for easy application. Don’t goop the paste on. Spread it evenly over the processor, leaving a little bit of space around the edges to spread. Apply a little bit of paste to the bottom of the CPU cooler as well.
Step 9b
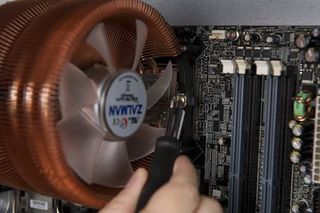
Carefully place the CPU fan on top of the processor, with the fan facing away from the back of the case (as seen in our photo). This ensures that air flows smoothly from the front of the case through and out the back. Drop the clamping bridge under the center of the cooler, and screw in one side with the screws packaged with the cooler. Screwing in the other side requires a bit of strength, as the clamp will bend to lock the cooler into place. Don’t press too hard or you’ll risk damaging both your CPU and motherboard. We recommend screwing both sides in halfway first, then slowly tightening each side.
Step 9c
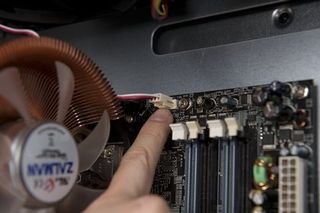
Plug in the CPU fan adapter to the three-pin port located near the processor socket. Refer to your motherboard manual for the exact location, as it may vary from model to model.
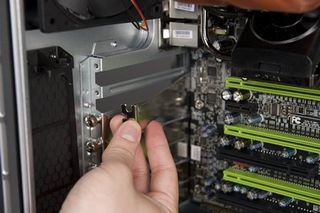
Step 10a
Remove a few of the PCI slot shield plates from the back of the case. You only need to take out the ones that are blocking the holes you’ll need for your video card. With our 9800GTX, we’ll need to remove two shields.
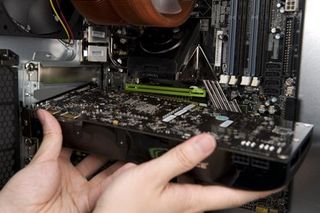
Step 10b
Drop in your video card into the PCI-E slot. If your motherboard has more than one slot (as ours does), check the manual to locate the correct one. In our case, we’re using the “primary” PCI-Express slot, which has the most bandwidth for graphics. Push the card straight down into the slot gently and firmly, and make sure the white retention clip snaps into place. Screw the video card’s bracket into your case.
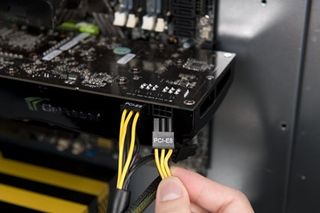
Step 10C
Pull two six-pin PCI-E power cables from your power supply and plug them into your video card. Some video cards will only require one power connector. If your power supply doesn’t have enough PCI-E power cables, you can use a molex adapter that should be included with your graphics card.

Step 11a
Locate two memory slots on your motherboard. Our build will have two 1GB sticks of DDR memory. You’ll want to insert them in alternating slots (color-coded on our motherboard) to run the memory in dual-channel.
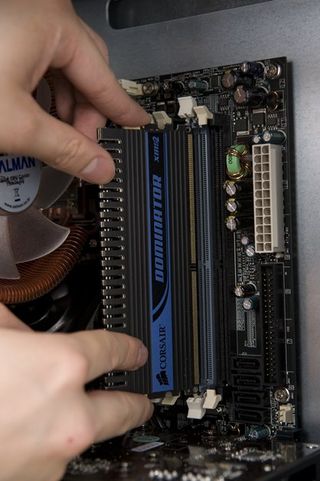
Step 11b
Align the RAM so the gap in the row of pins matches the slot on the motherboard. Plug the RAM into the slots until the locking brackets on both sides snap up. Make sure your RAM is completed seated, as improperly-installed RAM is the source for many system malfunctions.
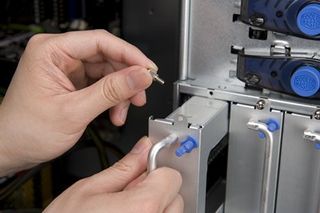
Step 12a
Hard drive cages like these are a feature unique to high-end cases like the Coolermaster Cosmos 1000, and they’re much easier to work with than standard hard drive bays, which practically have you crawling inside your own case like a hamster. Remove the thumbscrew and pull out the cage bracket.
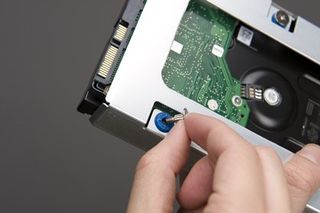
Step 12b
Screw the hard drive into the bracket. The washers in the Cosmos’ hard-drive bracket are made of rubber, which helps cushions the drive against jostles (to a very limited degree), and also cuts down on noise and rattle.
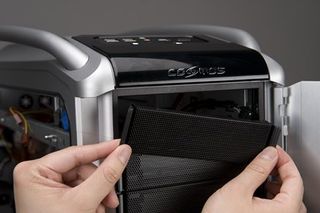
Step 13a
The Cosmos doesn’t require any tools to install or remove optical drives and drive-bay accessories. To open a slot, just squeeze the two ends of the front panel plate.
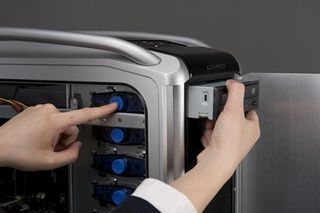
Step 13b
Slide your optical drive in until it’s flush with the front panel. Just press the button on the side of the interior cage to lock the drive into place.
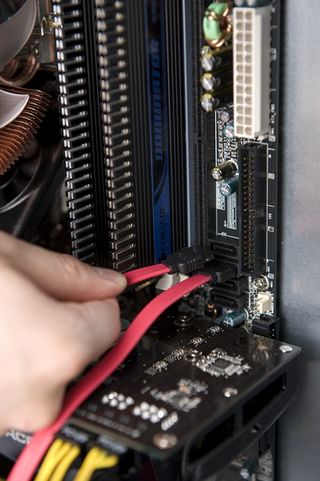
Step 14a
Plug a SATA cable into your motherboard for every drive you have (including hard drives and optical drives).
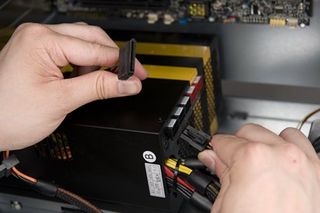
Step 14b
Plug a SATA power cable into your power-supply (these should be included with your PSU). These power cables have a fl at SATA power connector on one end.
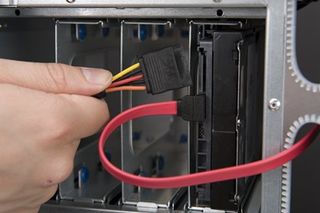
Step 14c
On all of your hard drives and optical drives, attach SATA and power cables from the previous two steps. If a single drive includes both a SATA power connector and a traditional 4-pin Molex connector, use either one, but NOT both.
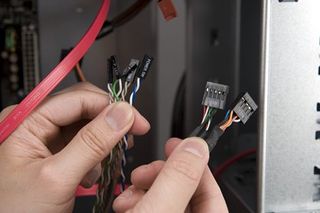
Step 15a
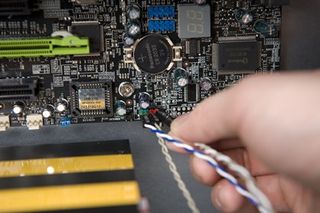
Gather up the front panel connectors that you put aside from the beginning of this tutorial. Separate the small ones that correlate with the frontpanel power switches from the ninepin USB and Firewire cables.
Step 15b
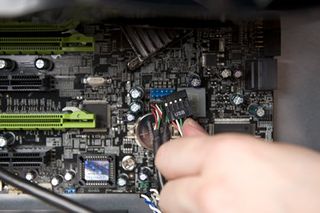
Using your motherboard manual as a reference, plug in the front-panel cables to your motherboard. Some motherboard manufacturers like ASUS include an adapter that lets you affix all the cables at once.
Step 16a
Most cases have front panel USB, Firewire, and headphone jacks, among other ports. Again, look to your motherboard documentation to find out where these go. Just make sure you don’t plug a USB jack into the Firewire port, which may short the motherboard.
Step 16b
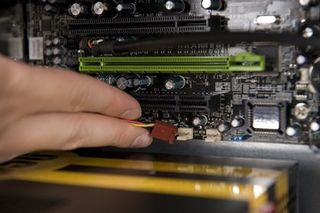
Plug in all of your case fans into the various three-pin ports on the motherboard. If your motherboard doesn’t have enough fan slots, you can always use a Molex adapter to plug the fans directly into your power supply.
Step 17
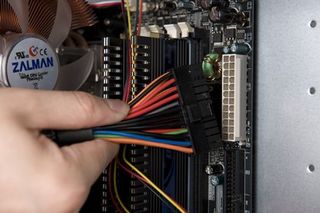
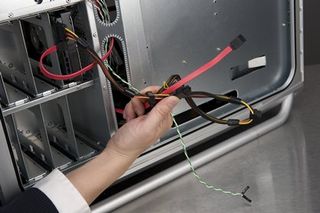
Locate the eight-pin power cable from your power supply, which provides power to the CPU, and plug it into your motherboard. Like the PCI-E connector, this plug is keyed and should only fit in one way, so there’s no risk of putting it in backwards. Finally, you’ll need to power up the motherboard by connecting the 24-pin main power connector (as shown in the photo). With our 850-watt power supply, there should be more than enough juice to energize our system, with power to spare for any upgrades (ie. SLI, additional hard drives, etc).
Step 18
The finish line is in sight! This fi nal step isn’t necessary, but we like tidying up our cabling by hiding all the excess and loose wires out of the way. With our case, we can pull cables and hide them behind the motherboard-mounting platform, or in empty slots in the hard drive cage. Other cables can be neatly bundled with plastic zip ties too. Neat cabling arrangements aren’t just aesthetically pleasing – they help improve airflow as well!
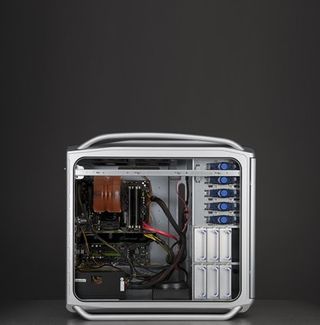
Say hello to our Budget Badass!
So what did $1500 get you? Answer: a quad-core machine that will be able to run DirectX 10 and has a hell of a lot of upgrade possibilities (not that you’ll need any for a while).
Benchmarks
How does our DIY machine perform in games? We stress-tested the system with a variety of benchmarks and games (full benchmarking details on page 88), and here are the results:
Settings: 1280x1024, all settings on high, no AA or
AF (all games patched to latest version)
3DMark 06: 10882
3DMark Vantage: 5653
Crysis GPU Test: 37.91 fps
World in Conflict: 35 fps
Company of Heroes: Opposing Fronts: 59.4 fps
Half-Life 2: Episode One: 143.9 fps
Settings: 1600x1200, all settings on high, no AA or AF (all games patched to latest version)
3DMark 06: 10265
Crysis GPU Test: 25.17 fps
World in Conflict: 35 fps
Company of Heroes: Opposing Fronts: 59.3 fps
Half-Life 2: Episode One: 141.2 fps
Settings: 1920x1200, all settings on high, 2x AA and 4x AF (all games patched to latest version)
3DMark 06: 9982
Crysis GPU Test: 21.44 fps
World in Conflict: 34 fps
Company of Heroes: Opposing Fronts: 58.7 fps
Half-Life 2: Episode One: 134.8 fps

Benchmark your brand new PC
Head back to the table of contents
PC Gamer is the global authority on PC games and has been covering PC gaming for more than 20 years. The site continue that legacy today with worldwide print editions and around-the-clock news, features, esports coverage, hardware testing, and game reviews on pcgamer.com, as well as the annual PC Gaming Show at E3.
Most Popular


