How to transfer systems from 3DS to New 3DS
Did you just buy a New 3DS, thinking you could simply sign in with your Nintendo ID and pick up where you left off with your previous handheld? Or have you done a system transfer with your 3DS before and think this’ll be just as straightforward? Well, I can tell you from experience that you’re dead wrong. Transferring your 3DS system information to a New 3DS is complex and time consuming, so much so that you may need a guide to keep everything straight.
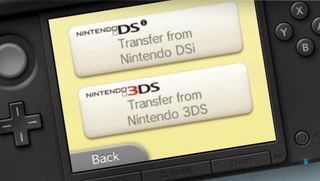
So, to prevent others from making the same mistakes I did, I’ve created this step-by-step guide on how to transfer all the necessary information from your old 3DS to your New Nintendo 3D XL. Here’s what you'll need before you get started:
A small (size zero) Phillips Head screwdriver
A micro SD card matching or exceeding in storage capacity to the SD card currently in your old 3DS
A PC or Mac with an SD card reader
Access to a wireless internet connection
Quick note on SD cards: Both models of New 3DS come with a 4GB micro SD card in the system. That’ll be acceptable if you don’t download many full games, otherwise you’ll really need a new card with more storage. I suggest getting a 32GB micro SD card ASAP. It’s the highest storage the system allows and is relatively affordable. You’ll save yourself a lot of trouble down the road if you get the maximum size now, and if you’re current 3DS uses an SD card bigger than 4GB, this is required for a smooth transfer. Also, be sure to get a micro SD with an adapter, because you’ll need it later.

Getting started:
So, your New 3DS (either XL or standard) is out of the box, and your old 3DS is right next to it, along with a screwdriver, and preferably a micro SD card that’s larger than 4GB. Turn on both systems. Start up your New 3DS and quickly skip through the set-up - you won’t be keeping any of that info anyway. Go into “System Settings,” then “Other Settings,” and head to the fifth tab for “Update System.” Getting the most up to date firmware now will save time later.
While waiting on that, with your old 3DS off, take out your current SD card and put it in a compatible PC or Mac (or USB card reader). Copy all the files off the old SD card into a new folder on your computer. This can take some time, but doing this pre-transfer will simplify things later.
Sign up to the 12DOVE Newsletter
Weekly digests, tales from the communities you love, and more

With all that done, head back into your New 3DS’s “System Settings,” “Other Settings.” On the fifth tab you’ll see “System Transfer.” Press that, then take the same menu path on your old 3DS and turn on “System Transfer.” On both choose “Transfer from a system in the 3DS family.” Now, and this is crucial, on your old 3DS choose “Send from This System,” and on New 3DS choose “Receive from Nintendo 3DS.” Both handhelds will then connect to the internet, and the real fun begins.
You’ll see a series of prompts to confirm that you want to transfer between the two models. Once you finally confirm, you’ll be asked to delete all the data on the New 3DS’s micro SD. Choose “Delete,” then confirm that no other SD cards have been used on the New 3DS. Then select “Yes” when asked about using an SD card on your old 3DS. Now the system transfer prompts will give you options on how to transfer information from one SD card to another. “PC-based transfer” is by far the easiest option, so choose that, then pick “Move.” At that point, all the data not on the SD card will move between systems. This takes some time, so get comfortable.
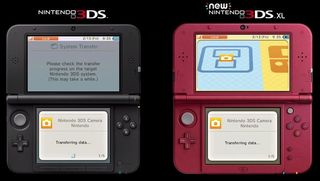
After watching the fun animation of Pikmin walking your data between systems, both handhelds will say the process is complete, and then restart. Your New 3DS should have your account on it, while your old 3DS will be back to factory settings. Turn off both systems, because now is the most complicated part.
Transferring SD card information:
As I instructed earlier, you copied all the info off your old 3DS SD card onto a computer and purchased an appropriately sized micro SD with an SD adapter, right? Good, because now is the time to do the “PC-based transfer” as Nintendo calls it. Again, you can choose to do this wirelessly, but I can tell you from experience that attempting it with more than 4GB of data takes hours and hours to do. Using a PC is much faster, but it does require a couple tools.
With the old 3DS’s SD card info copied to a PC, put your new micro SD in an SD adapter and place it into the SD card slot on your computer. Copy and paste all the 3DS game files onto the new SD card, which can take a little while.
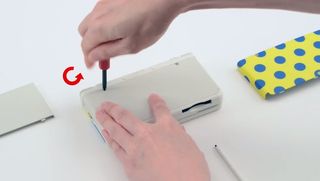
Once all the files are on the new micro SD, it’s time to pick up that screwdriver. With your New 3DS off, turn it over to see the back of the system. Near the top of both XL and standard New 3DS models, on the right and left, are two tiny screws. Very carefully unscrew them using the small Phillips Head (or crosshead) screwdriver, turning them counterclockwise. The screws don’t come out, but you’ll hear a little click when they’re as loose as possible.
With the screws loose, along both sides of the New 3DS you’ll see little trenches in the plastic. Gently pull under them and lift off the back. You’ll feel a little resistance, but if you correctly unscrewed the back, it should pop off with a little force. Just be double and triple sure you’ve properly loosened those screws before pulling on that plastic.
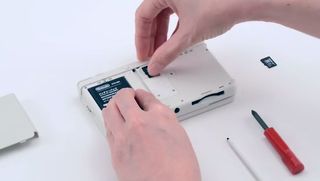
In the center of the New 3DS’s newly uncovered back is the tiny slot for the micro SD card. Carefully remove the 4GB micro the system came with, and replace it with the new micro SD you just finished transferring files to. Then snap the back cover into its previous spot, tighten the screws, and switch your system back on. It should recognize all of your old games and software, and the menu should be identical to your old one. Boom, transfer complete!
Final thoughts:
Whew, that sure was complicated, huh? Well, at least it’s over, and you’ll probably never have to do it again, especially if you have the biggest micro SD card installed already. Let’s just hope Nintendo doesn’t launch the Newer 3DS XL next year. Until that happens, I’m going to take a nice long bath to shake off all the stress of a 3DS system transfer. Good luck!
Henry Gilbert is a former 12DOVE Editor, having spent seven years at the site helping to navigate our readers through the PS3 and Xbox 360 generation. Henry is now following another passion of his besides video games, working as the producer and podcast cohost of the popular Talking Simpsons and What a Cartoon podcasts.

