Kingdom Hearts: Dream Drop Distance - Beginner's guide
Go the distance in Traverse Town
Dive Mode: Sora
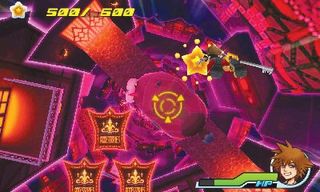
In this mini-game, the objective is to take out enemies and collect prizes as Sora falls at high speed, then pass through the goal ring that appears once you’ve met certain requirements. The requirements vary from dive to dive.
Press A to attack enemies encountered during a dive. A red target marker on an enemy means they are out of range of your attack, whereas a yellow target marker indicates that the enemy is within range. Keep pressing A after landing a blow to perform a combo and hit other nearby enemies. Attacking can also be used as a means of acceleration, even when no enemies or obstacles are below. Hold B to reduce speed with Aerial Brake, or press Y to quickly dodge or deflect an attack or obstacle. Decelerate and dodge to make it safely through the dive. Keep in mind that decelerating using the Aerial Brake can increase the amount of time to clear the dive, so don’t use it often.
If you pick up a magic prize, press X to perform a special magic attack before the dive is over. Magic prizes are small orange-yellow orbs. Special attacks like Mega Flare can wipe out several enemies or obstacles simultaneously, to great benefit in this timed event.
Use the Circle Pad to steer Sora through the air, and fly through rings of stars to collect prizes. Avoid floating floors and balconies, and use attacks A or Aerial Brake B to fly through the blades of spinning fans. Aim for stars and magic prizes, defeat enemies, and strike floating cards marked with yellow reticules to produce munny, HP balls, and more stars to collect.
Continue through the goal ring. Afterward, you are ranked according to your time and number of prizes grabbed. Score an “A” this time to obtain the Spark Dive command, a skill to use during battle. Press A to leave the rank screen and continue.
Traverse Town
Traverse Town is a kind of depot or way station between worlds, where those who are lost can find their destination. For some reason, the boys and girls you meet in this world are all playing a timed game.
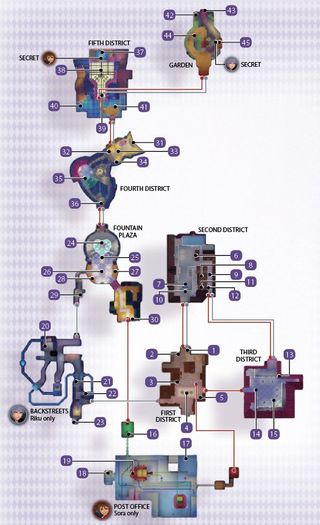
Unfamiliar Friends on Familiar Ground
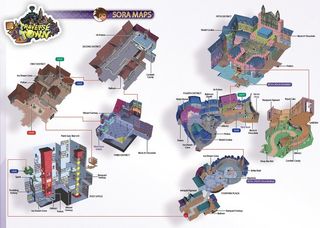
Above: Click the image for a bigger map.
Sora never gets tired of coming back to this place. When he is unable to find Riku, some guy tells him to quit yelling. This mysterious person with headphones knows Sora’s name, and he’s a player in some kind of game where he must find his partner and complete a mission within a time limit. He uses a new skill called “Flowmotion” to leave the area. Now it’s your turn.
Tutorial: Flowmotion Basics
Use Circle Pad + Y to slide into a wall or pole, and you will enter Flowmotion. While in Flowmotion, press B to jump or Y to gain a burst of speed. A slightly easier way to trigger Flowmotion is to jump and perform an Air Slide into a wall or pole to get the ball rolling.
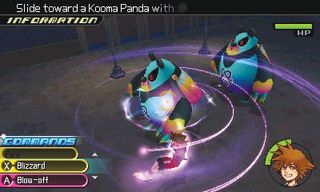
Use the lamppost to gain a burst of speed. Simply move toward it and press Y to begin spinning around it. Press Y again to fly off the lamppost, and then steer Sora to a wall if you can manage. This will allow you to continue using Flowmotion with another burst of speed or jump. You can use a burst of speed after performing a Flowmotion jump to quickly traverse each area. These exercises help you learn to control Flowmotion.
You don’t always have to slide into Flowmotion. Some objects like handholds, ropes, and stair rails trigger Flowmotion when landed on. Jump onto the nearby stair rail to trigger Flowmotion. Leap from the rail with the right timing and you can land on the roof of the central building!
Find the Save Point
After the Flowmotion tutorial, your objective is to go after the boy with headphones. Note that you do not encounter enemies in this area during your first visit. Head upstairs and continue toward the door at the north end of the area (marked pink on the Touch Screen map) to find a glowing green circle on the ground, which is a save point. Standing over the light allows your character and their Dream Eaters to recover HP lost during battle. Press A while at a save point to open the save menu, where you can do the following:
- Save your game progress
- Return to the World Map
- “Drop” or switch characters
Use Flowmotion to Reach Higher Levels
By referencing the maps provided in this guide, you’ll spot a chest containing an Ice Dream CONE near the save point. However, searching the save point area does not turn up a chest. The reason is because the chest is located on a higher level. To reach the higher level, try using Flowmotion to have Sora land on the roof of the central building in First District. Then, jump B and Air Slide Y over to the rooftop to reach the chest. There are many such chests on higher levels throughout the game, so rely on Flowmotion to go higher!
Reality Shift
Now Where’d That Kid Go?
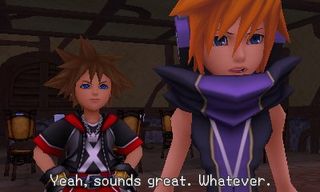
After completing the Reality Shift tutorial, press the Zoom button (the magnifying glass icon) on the Touch Screen map to zoom out and view the entire map of the area at once. Notice the flashing pink door in the alley off to the far right: that’s your objective. But as Sora approaches the center of the area, he encounters the headphones kid again, who finally introduces himself as Neku. However, the introductions must wait, as Dream Eaters appear.
Flowmotion Combat
Even with combos, chopping away repeatedly at one enemy while surrounded can be difficult and time-consuming. Eliminate two or more enemies at a time with Flowmotion Combat. As before, press Y while moving toward a wall, pole, or other object to trigger Flowmotion, and then immediately press A to perform a Flowmotion attack. Launching an assault during Flowmotion changes your basic attack according to your current Flowmotion action (depending on what kind of surface or object you use to trigger Flowmotion). This is a great way to make combat easier against groups of adversaries.
Next up, trigger Flowmotion Throws by sliding into large enemies, such as the Kooma Pandas that suddenly appear. Press Circle Pad + Y to slide into a large opponent, and Sora begins to spin around them. While spinning, press A to send the enemy flying (hopefully into other foes). Defeat both of the Kooma Pandas using Flowmotion Throw.
Time to Create Spirits
Clearing the area of Dream Eaters triggers a Flashback, with Yen Sid explaining the difference between Spirits and Nightmares. Nightmares are the enemies you’ll fight throughout the game, whereas Spirits are companions that you can create and recruit to follow you into combat.
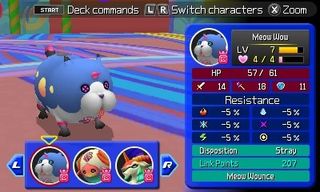
Whether you play or skip the Flashback, you receive Glossary: Heartless and the Meow Wow Recipe. The subsequent tutorial then walks you through creating your own Spirit using Dream Pieces (items collected from defeated Nightmares). Here are a few pointers to keep in mind during the tutorial:
- A recipe is not necessary to create a Spirit; having one just guarantees the result.
- When possible, always use more materials than are necessary to create the Spirit with a higher rank or level. Press the “+” sign below each material next to the quantity to raise the number used. For example, the Meow Wow Recipe requires three Rampant Figments, so let’s say you have five on hand. If you increase to four Rampant Figments, Meow Wow’s level increases to 2. However, using five Rampant Figments does not increase the Spirit’s level any further, so adding the fifth would be a waste. If you find that you cannot gain a stat boost by increasing a material, then don’t.
- When possible, always sacrifice a deck command for a stat boost. Avoid sacrificing special ability commands, such as Spark Dive. Sacrifice plentiful item commands instead, like Potion or Hi-Potion.
- Give each Spirit a unique name; you’ll likely make more than one of each kind of Spirit, and having three or more all named the default “Meow Wow” becomes a hassle later.
Sign up to the 12DOVE Newsletter
Weekly digests, tales from the communities you love, and more

Kingdom Hearts 4 has been radio silent for 1,005 days, but don’t worry - Tetsuya Nomura teases he has the story planned out

The original Kingdom Hearts was initially "more hardcore" until Square Enix toned it down: "We had some puzzles in there that would make you go, 'what is this, Takeshi's Challenge?'"