How to destroy your PS3 controller
Home console DIY really is 'Destroy It Yourself'
It seems consoles and their peripherals are just like modern cars. In the past, you could open them up and see what's going wrong -these days you're just met with alien components and bewilderment. But that just made me more determined than ever to fix my broken DualShock 3.
I imported said DualShock when PS3 finally got rumble inthe far-off lands of the Far East a couple of years ago. It cost a pretty penny, but it was and still is my favourite PS3 pad. But while playing Formula One Championship Edition over the weekend (I'm getting some practise in for the new Codies game), the car kept shifting down a gear without me asking itto. A closer inspection revealed a very loose-feeling L2 button. Time for some DIY.

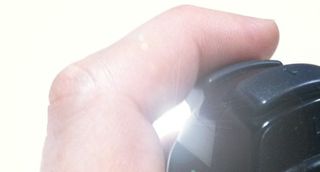
Above: Apologies for the lens flare - it wasn't a very exciting picture so I sexed it up a bit
Upon turning it over, I discovered to my utmost surprise, the thing has normal Phillips screws to hold it together. Usually, you're met with security screws that stop you doing anything to the unit without some magical tool that's only available to hardcore modders, repair centre employees and Valiente-level witches. So in I went. Out came the five screws, and then (with a little mob-style 'persuasion') the thing came apart. And stuff fell out everywhere.
Turns out the joypad is designed to be held together by its own casing. The shoulder buttons have loose bits of plastic and no real seating, and the battery is pretty much loose over the top of the PCB. My immediate thought was 'gak!', which roughly translates as 'Oh, sweet Jebus, what have I done?!' but takes less time to say.
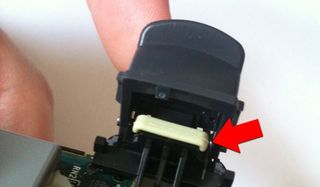
But after a little nosing about, I discovered the problem - a tiny piece of wire coiled once to make a spring, which was coiled slightly too far to function correctly. So I took it out and tried to bend it a little. Immediately, it broke in my hands with acute little'clink'. Damn. Well, I suppose that was the bit that was broken anyway, so it's no great loss...

Above: Stupid coiled spring that is really springy until you actually need to bend it
Sign up to the 12DOVE Newsletter
Weekly digests, tales from the communities you love, and more
So, rather than give in at this stage and take the pad for repair, I rummaged around and found one of my old Sixaxis pads. Five screws andmore gentlepersuasion later, it was open on the floor with its insides everywhere. And there, accompanied by angelic 'aaaahs', I saw it - the same coil of wire, which fitted in the same way.

Above:Oh, really? You thought so too? Well, I am considering becoming ahand model...
Whoever puts these things together in Japan is extremely dextrous with their fingers. Trying to keep the tiny metal axle in place with the spring above the saddle while simultaniously aligning two loose pieces of plastic is ridiculously hard. And once you've done one, you've got to do the other side without touching the first, all before getting the case back on without disturbing any of the above. It took half an hour just to do this part.
But, in a triumph for twenty-something men everywhere, I prevailed. The case clicked shut. The lights blinked on and then synced to the PS3. All the buttons worked and the rumble was strong. And best of all, the L2 button was firm and responsive. I had won.
But just as the street parade was in full swing and the crowd outside had begun to chant my name, my eyes came to rest onmy repaired pad's fallen comrade. It was bleeding heavily but its light were still blinking, trying in vain to sync with a console that no longer knew its name.

Above: Time to meet your maker, Sixaxis. Where's your tilt now? Eh?
'It's OK,' I thought. 'I can stillsave it'. All I needed to do was replace the spring in the old Sixaxis andI could put it back together. But alas, everything I tried was too thick. And it wouldn't go back together. But then, even when I tried to cut my losses and took the spring out altogether to justclick the thing shut, I couldn't. Maybe the design was older, or perhaps I hadn't found the right positions for the shoulder buttons, but it simply wouldn't go back together. I had killed it.
And sadly, that is where the story ends. I saved my beloved DualShock 3, but at what cost? Can I really condone the sacrifice of one life to save another?
Still, you know what they say: Every Sixaxis dies. Not every Sixaxis truly lives.

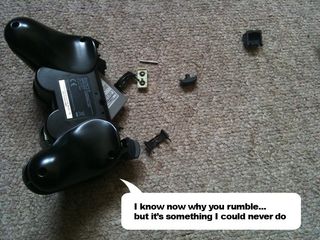
Above: Perfect! All the bits are back together. Possibly not quite in the same order as they were at the start
Have you tried a DIY console repair that's gone horribly wrong? Let us know in the comments.
22 Jul, 2010
Justin was a GamesRadar staffer for 10 years but is now a freelancer, musician and videographer. He's big on retro, Sega and racing games (especially retro Sega racing games) and currently also writes for Play Magazine, Traxion.gg, PC Gamer and TopTenReviews, as well as running his own YouTube channel. Having learned to love all platforms equally after Sega left the hardware industry (sniff), his favourite games include Christmas NiGHTS into Dreams, Zelda BotW, Sea of Thieves, Sega Rally Championship and Treasure Island Dizzy.
Most Popular


