How to beat the Destiny 2 Spire of the Watcher Dungeon
Climb the Spire of the Watcher for this Destiny 2 Dungeon and stop the Vex threat to earn new wild west loot

The Destiny 2 Spire of the Watcher Dungeon is here with Season of the Seraph, and you’ll need to stave off a Vex attack on an old Warmind spire facility. Make sure you grab the ‘Ares Desperado’ quest from Ikora Rey first, then venture onto the surface of Mars and ascend the massive tower. You’ll become a master Arctrician by the end, as this Destiny 2 Dungeon requires you to solve puzzles and weaken bosses by powering up electrical circuits. You can also get yourself a powerful new Exotic Bow and live out your wild west dreams with some gunslinging outlaw-themed weapons and armor from Tex Mechanica. Here’s how to complete the Destiny 2 Duality Dungeon.
Destiny 2 Spire of the Watcher Dungeon encounters
- Spire of the Watcher intro and Arctrician circuit mechanic
- Ascending the Spire
- Akelous, the Siren’s Current boss
- Persys, Primordial Ruin final boss
- Duality rewards and loot
How to start Destiny 2 Spire of the Watcher Ares Desperado quest

Take a look at our Destiny 2 Season 19 guide to learn about everything featured in the new season
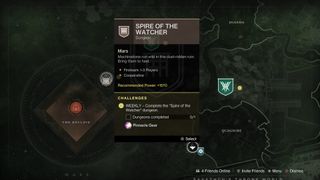
The Spire of the Watcher Dungeon is available to any player that owns either the Destiny 2 The Witch Queen digital deluxe edition or the Dungeon Pass – simply owning the Season of the Seraph Season Pass will not give you access to this Dungeon. If you’ve got either of those premium passes, get things started by collecting the ‘Ares Desperado’ quest from Ikora Rey in the Tower. You’ll now have access to Spire of the Watcher and can launch it by opening the Destinations page, selecting Savathun’s Throne World, and then selecting the Spire of the Watcher Dungeon node next to the Mars Enclave landing zone.
Destiny 2 Spire of the Watcher Arctrician and circuit mechanic explained

The three encounters in Spire of the Watcher all involve one circuit puzzle mechanic that tasks you with collecting a buff called ‘Arctrician’ from Vex enemies called ‘Conduit Minotaurs’, and then powering up circuits by shooting Arc nodes along large yellow cables. There are also red cables that appear just before and during the final boss encounter, but we’ll cover those further down. Here’s how the Arctrician and circuit mechanics work and how to complete the introductory encounter:
- "If your cake is trash, nobody wants to eat it": At a tough time for Destiny 2, Bungie drops an Exotic mission promising vampire vibes, a cool shotgun, and a finale with bite
- "Oryx is back": Destiny 2's final Episode takes the MMO to the site of the iconic Taken King expansion for a Coil-inspired roguelite mode, and also Star Wars armor

Make sure you're also up to speed on how to beat the Destiny 2 Duality Dungeon, if you're up for another challenge
After landing on the Martian surface, follow the path to reach a complex of small buildings with a wide path in the middle. Towards the far end of this path, you’ll spot a plate in the ground with four Arc nodes and yellow cables leading out of them, although these nodes are actually the end points of circuits. Carefully trace the yellow cables coming out of the nodes and you’ll eventually reach the starting nodes of the circuits. The starting Arc nodes on all yellow circuits in this Dungeon are marked by a nearby glowing arrow.
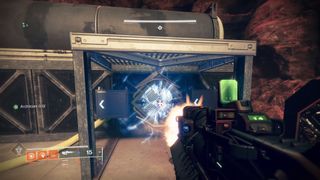
Now that you’ve traced a circuit back to its starting node, you’ll need to power it up. Find a Conduit Minotaur and kill it. It’ll briefly leave a white, glowing circle on the ground where it died. Anyone that touches this ring gains the Arctrician buff for 30 seconds and can power up Arc nodes by shooting them.

With the Arctrician buff, head back to the starting node of a circuit and shoot it to power it up – every node you power up extends Arctrician by five seconds. Now trace the yellow cable to the next node and shoot it – you’ll notice that yellow cables between two powered up nodes light up blue, so you’ll know you’re doing it correctly if the circuit changes color. Arc nodes powered up in this way will also never deactivate, so there’s no time pressure to these circuit puzzles.
Keep tracing the yellow cables to subsequent nodes and powering them up until you eventually reach the middle plate and power up the final node in a circuit. Once you and your fireteam have powered up all four circuits in this area, a large hatch will open in the central path, allowing you to descend into the spire complex and begin your ascent.
Destiny 2 Spire of the Watcher Spire Ascent encounter

After sliding down a very long and steep ramp, you’ll need to navigate through some vents and offices to eventually reach the Spire’s Reactor Firewall. This is just a platforming section, so jump along the walkways, hanging platforms, and ledges until you eventually reach a gravity lift that takes you up and into a large room with shuttered windows that’s full of computers. Find the ceiling vent on the opposite side of the room and jump up through it until you reach another computer room, although this one has open windows. Jump out the window and up onto a metal grate and then jump up again onto some solar panels to reach the first of three levels in the Spire Ascent encounter.

As before, this is just a case of killing a Conduit Minotaur, standing in the circle to get Arctrician, shooting the starting node of a circuit, and then tracing the yellow wire, shooting more arc nodes along the way, until you eventually reach the final node to fully power up the circuit. All three levels of this encounter only have two circuits to complete and powering up both circuits will activate a gravity lift near the end nodes to take you up to the next level. However, each level adds more complexity to the circuits, trickier environmental hazards, and more Vex enemies:
- For the first level, the two starting nodes are on one side of the spire and the end nodes are on the opposite side.
- Moving up to the second level, the two starting nodes are housed in a small corridor to the right with electrical traps at either end. The circuits then go in opposite directions around the spire, both featuring nodes that go into another electrical trap corridor before reaching the end node and the gravity lift. On this level, there’s also much less space to move around.
- On the third level – the final one – the two circuits start on opposite sides of the spire from each other but wrap almost all the way around it and cross over each other, eventually meeting on the same side of the spire. This level is made entirely of unlinked platforms, so you’ll have to jump around a lot.
Once the two circuits are powered up on the final level, you will have completed the Spire Ascent encounter and a loot chest will appear next to the gravity lift. To reach the first boss. Head into the lift which will take you into a large computer room. Jump and climb onto one of the ceiling walkways and throw the switch to open the room’s windows. Now climb up the last few ledges to reach the top of the Spire of the Watcher and the first boss, Akelous.
Destiny 2 Spire of the Watcher Akelous boss fight

Akelous, the Siren’s Current, is quite easy to defeat as the boss fight uses the same yellow circuit mechanics that you’ve just been practising. The goal is to power up four circuits to activate fuel rods, with the final one always luring over Akelous to make itself somewhat vulnerable. The arena is also a large ‘+’ shape, with a big, square area in the middle containing four starting Arc nodes, and four catwalks extending out – Arc nodes are found along each catwalk and the catwalks end with an Arc node and a fuel rod.

Because Akelous has such a small area to hit for damage, precision weapons and damage buffs are important here. Some of the best Destiny 2 Exotic weapons, including Izanagi’s Burden, Witherhoard, and Arbalest work really well when paired with a Linear Fusion Rifle. Broadly, any Sniper Rifles and Linear Fusion Rifles will be good choices here. As for Supers, damage buffs from Well of Radiance and/or Ward of Dawn will be valuable for maximising damage in each phase. More precise Supers such as Golden Gun (particularly with Celestial Nighthawk), Thundercrash, and Chaos Reach will also be useful here, but the focus should mainly be on using your weapons.
Here are the steps you need to take to bring down Akelous in Spire of the Watcher:
- Defeat a Conduit Minotaur and gain the Arctrician buff.
- Shoot the starting nodes in the central area and shoot the Arc nodes along the cables to eventually activate all four fuel rods.
- All players must head to the last fuel rod that was activated. Akelous will fly over to this fuel rod and will begin to deactivate them all.

- Stand in front of Akelous and destroy all of its red eyes by shooting them – the eyes are weak so any primary weapon is enough.
- Once all the eyes have been destroyed, Akelous will be vulnerable and can be damaged only by shooting its newly exposed central eye.
- Continue dealing damage to Akelous as it retreats towards the center of the arena. The damage phase will end when Akelous releases a large blast and overcharges its shields. Do not chase Akelous too much during this damage phase, as the blast it releases has a huge radius and can send you flying off the spire. Be careful!
- Repeat all these steps until Akelous crumbles.
With Akelous defeated, head to the middle of the arena to collect your loot and then descend towards the spire’s reactor.

To open certain doors to reach lower levels of the spire interior, you’ll need to activate new red circuits that are found in several rooms, including the final boss fight area. There are always five red cables in a room, each starting with an Arc node and ending at a locked door. With the Arctrician buff, you need to quickly shoot all five Arc nodes to power up all the red cables simultaneously and unlock a door. Once you reach the reactor, it’s time to face the final boss of Spire of the Watcher, Persys.
Destiny 2 Spire of the Watcher Persys boss fight

The fight against Persys, Primordial Ruin – a massive, ancient Vex Wyvern – combines everything you’ve just been using to get through Spire of the Watcher. Your objective here is to power up a reactor core purge and trap Persys by completing yellow and red circuits. Doing so will temporarily bring down its shield, allowing you to deal some damage.
The boss arena is split into two main rooms. They’re linked by two side corridors and a central doorway that must be manually opened or closed by activating the red node circuit:

- The control room: The room you start the fight in which features four concrete pillars. The starting nodes for the four yellow circuits and four of the five red circuits are attached to these pillars. The fifth red circuit is above the central door.

- The reactor room: Houses the reactor and all the end nodes for the yellow circuits. This is where you need to trap Persys.
Vex Goblins and Supplicants (exploding Harpies) spawn almost constantly across both rooms. The Supplicants are especially annoying and can easily blow you up if you stay in the same place for too long or aren’t careful enough.
When it comes to damage, Persys moves around a lot so it can be hard to consistently land your shots with precision weapons. We recommend Linear Fusion Rifles if you’ve got good aiming skills, but Rocket Launchers will also be good. Because Persys also moves around and has very powerful attacks, a Well of Radiance isn’t really that useful here, and you should instead focus on pure damage. Shadowshot, Gathering Storm, Nova Bomb, Chaos Reach, Hammer of Sol, and Thundercrash are all good Super options, and make sure you use things like Void Grenades, Smoke Bombs, or Child of the Old Gods to apply weakening effects.
Here’s how to arm the reactor purge, trap Persys, and defeat it in Spire of the Watcher:
- Defeat both Incarceration Hydras that spawn in the control room so that Conduit Minotaurs can spawn.
- Defeat a Conduit Minotaur and collect the Arctrician buff.
- Shoot the five red nodes in the control room (one on each of the four pillars and one above the central door) to open the central door leading to the reactor room.
- A few seconds after the door opens, two of the four starting Arc nodes for the yellow circuits in the control room will become active and can be powered up with Arctrician.
- Continue powering up the nodes along the circuit, following them into the reactor room to reach the end nodes.
- While the nodes are being powered up, Persys needs to be lured into the reactor room. If you’re doing this Dungeon solo, Persys will obviously be following you constantly, but if you’re in a fireteam, it’s a good idea to have one person dedicated to leading it into the reactor room.
- When both yellow circuits are completed and the reactor core purge has been armed, all players must get to the control room.

- Shoot the red cable nodes to close all doors, preventing Persys from deactivating the purge. The reactor core will explode and remove Persys’ shield.
- After the central doors open, deal as much damage to Persys as possible as it marches into the control room. You’ve got roughly 20 seconds of damage time before Persys gets its shield back.
- Repeat these steps until Persys has been defeated.
- With Persys dead and the Spire of the Watcher saved, you’ve completed this Destiny 2 Dungeon! Make sure you collect your gunslinging gear drops from the chest.
With Persys dead and the Spire of the Watcher saved, you’ve completed this Destiny 2 Dungeon! Make sure you collect your gunslinging gear drops from the chest.
Destiny 2 Spire of the Watcher loot and gear

The Spire of the Watcher Dungeon offers some especially unique loot themed around the Tex Mechanica weapon foundry, making you look and feel like a gunslinging cowboy. There’s also uncapped loot, so you’ll get rewards every time you complete an encounter, even if you’ve already completed the whole Dungeon once for the week – be sure to stay on top of when the Destiny 2 weekly reset is for other activities. The first two encounters drop one item each, and the final encounter drops two, so that’s four bits of loot. Here’s what’s up for grabs in Spire of the Watcher:
- Hierarchy of Needs Exotic Bow: Precision hits and final blows build Guidance Ring energy. When fully charged, hip-firing an arrow creates a Guidance Ring. Arrows fired through a Guidance Ring release extra seeking projectiles that deal more damage the further they travel.
- Long Arm Scout Rifle
- Liminal Vigil Sidearm
- Terminus Horizon Machine Gun
- Wilderflight special-ammo Grenade Launcher
- Seventh Seraph Carbine Auto Rifle (reprised Season of the Worthy weapon)
- Seventh Seraph Officer Revolver Hand Cannon (reprised Season of the Worthy weapon)
- Tex Mechanica armor sets for each Destiny 2 Class
Up the difficulty of Spire of the Watcher to Master for a chance to get Artifice armor, which comes with an extra Artifact mod slot to help your builds. There are also plenty of Triumphs to get that both improve the drop rate of Hierarchy of Needs and contribute towards the new WANTED Seal and title. Good luck, Guardians!
Season of the Seraph is the last season before Destiny 2 Lightfall drops, so get up to date on what's new in the expansion.
Sign up to the 12DOVE Newsletter
Weekly digests, tales from the communities you love, and more

Will Sawyer is a guides writer at 12DOVE who works with the rest of the guides team to give readers great information and advice on the best items, how to complete a particular challenge, or where to go in some of the biggest video games. Will joined the GameRadar+ team in August 2021 and has written about service titles, including Fortnite, Destiny 2, and Warzone, as well as some of the biggest releases like Halo Infinite, Elden Ring, and God of War Ragnarok.















"A fun example of a bug becoming a feature": Destiny 2 accidentally made Exotic Glaives free to all classes, and Bungie says "we're going to let this ride"

Destiny 2's new Episode suggested the upcoming Apollo expansion will launch on July 15, but that date has mysteriously been scrubbed from the game
