Dark Souls Remastered full walkthrough guide: every area, boss, secret and more
Survival tips for Dark Souls Remastered - how to beat the game from start to finish
Dark Souls Remastered full walkthrough: TOMB OF THE GIANTS PART 2
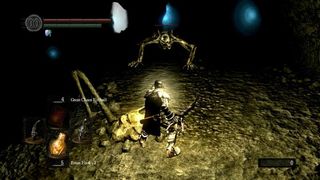
You’ll soon encounter your first Skeleton Beast. It is more important to attack these creatures from a distance than it is with the Giant Skeletons, because the beasts are quicker and can destroy you in a single attack. One strong Pyromancy spell (Great Chaos Fireball) should do the trick. Proceed through the fog door.
Once you pass through the door, there’ll be another archer shooting from the left, a beast in front of you, and a beast to your left. The beasts are too far away to attack you right away, but there’s also a Silver Knight (does not respawn) who charges in to make your day extra fun. Focus on him first, making sure not to stray too far from the door so as not to aggro the beasts. Once he’s gone, mop up the area.
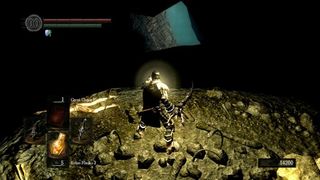
Loot the corpse near where the archer stood, then walk past the corpse and off the ledge pictured above (trust us). You’ll land on a narrow path leading to the very valuable Covetous Silver Serpent Ring (boosts souls gained by 20%). However, getting near the item prompts several Skeleton Pillars to appear and surround you, so be ready to backpeadal. Drop down to a nearby visible ledge to progress.
If you go back and explore the rest of the area thoroughly, you’ll find an Effigy Shield and another bonfire.
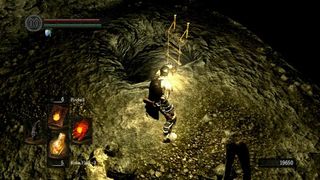
Your goal is this ladder leading down (seen above). Soon after climbing down, you’ll no longer need a light source.
If you are in human form at this point, the black phantom NPC Paladin Leeroy, who helped you in the Pinwheel fight, will invade. He drops the Sanctus shield (incredible, because it has an HP regen effect) and the Grant hammer.
As you into the cave and along the next long ledge, several more Skeleton Pillars will spawn. At the far end, an archer will be annoying you with his arrows. Once you approach him, be wary of the Giant Skeleton lurking just out of view to your left (archer’s right).
In the next area you’ll encounter several Pinwheels. You can easily dispatch most of them from the first ledge with a bow, since they stagger after every hit and will be unable to cast. Otherwise, it’s best to rush them one at a time (much like the previous boss). Tiny skeletons will contiuously spawn from the water as well. These only pose a threat if they gather up and surround you.
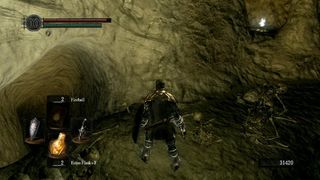
Make a careful note of this cave on the left side of the screen seen above. This is just before the fog door. Drop off into the spot shown to find the White Titanite Slab. When you’re ready, head through the fog door.
BOSS – GRAVELORD NITO
You should go into this fight with medium armor (medium-speed roll action). Nito is vulnerable to fire, so Pyromancy is a great tool in this fight.
As soon as you drop into the arena, heal (unless you used fall control). Nito is a necromancer, so the trio of skeletons he has with him will revive unless you kill them with a divine weapon.
Our exact strategy was to use a divine weapon to deal with the trio of skeletons that rushed at us, then dance around Nito chucking Pyromancy spells. Just try to stay out of the aggro range of the giant skeletons in the back of the arena. From medium range, all of Nito’s attacks are telegraphed and easily avoidable. If he starts to charge up, however, run far away, for his AOE attack is massive. Also, if his fist glows, that means he’s going for a grab attack, which has surprising range and tracking and also deals lots of damage.
If you are far away from Nito and you hear a scream, that means he’s about to shoot a blade up through the ground at your feet. You best bet is to roll or jump a couple seconds after you hear the scream.
Alternatively, if you have a strong weapon, equip very heavy armor, apply iron flesh, rush Nito, and hack away (similar to the Four Kings strategy) with no regard for blocking. Just watch out for that AOE attack.
After the battle, don’t forget to loot the nearby corpse for the Paladin Armor set. Use the bonfire to warp out.
Jump to Section
- Firelink Shrine
- Undead Burg part 1
- Undead Burg part 2
- Undead Parish part 1
- Undead Parish part 2 (First Bell)
- (OP) Grinding for Souls & Finding Goodies in Darkroot Garden
- Lower Undead Burg
- (OP) Returning to the Undead Asylum
- The Depths
- Blighttown
- (OP) Exploring Blighttown's Swamp
- (OP) Undead Dragon & Valley of the Drakes
- Quelaag's Domain (Second Bell)
- (OP) Moonlight Butterfly & the Divine Ember
- (OP) Darkroot Basin, the Hydra, and Dusk
- Sen's Fortress part 1
- Sen's Fortress part 2
- Anor Londo part 1
- (OP) Painted World of Ariamis part 1
- (OP) Painted World of Ariamis part 2
- Anor Londo part 2
- Return to Firelink Shrine & Placing the Lordvessel
- Sif and the Darkroot Garden
- New Londo Ruins
- The Catacombs
- Tomb of the Giants part 1
- (OP) Dark Sun Gwyndolin & the Blade of the Darkmoon Covenant
- Duke's Archives
- Crystal Cave
- Demon Ruins part 1
- Demon Ruins part 2
- (OP) Great Hollow & Ash Lake
- Lost Izalith
- (OP) Sanctuary Garden (New Content)
- (OP) Oolacile Sanctuary & Royal Wood (New Content)
- (OP) Oolacile Township (New Content)
- (OP) Chasm of the Abyss (New Content)
- (OP) Black Dragon Kalameet (New Content)
- Kiln of the First Flame & Gwyn, Lord of Cinder
Current page: Dark Souls: Tomb of the Giants Part 2
Prev Page Dark Souls: Tomb of the Giants Part 1 Next Page Dark Souls: Dark Sun Gwyndolin (Optional)Sign up to the 12DOVE Newsletter
Weekly digests, tales from the communities you love, and more
Dark Souls Remastered seamless co-op is officially coming from the creator behind the same Elden Ring mod, and it's set to include everything from PvP to scaling
There's a whole world of Dark Souls-style lore hidden in this series of dress-up games, and I bet you can't tell which is which


