Dark Souls Remastered full walkthrough guide: every area, boss, secret and more
Survival tips for Dark Souls Remastered - how to beat the game from start to finish
Dark Souls Remastered full walkthrough: TOMB OF THE GIANTS PART 1

Most of the Tomb of the Giants is pitch-black. If you were lucky enough to get a Skull Lantern off of a Necromancer back in the Catacombs, now is the time to use it (put it in your shield hand and press RB). Other options include the Cast Light spell bought from Dusk (a better alternative) or a Sunglight Maggot Helmet, which is extremely difficult to obtain at this point.
Note that there are no Necromancers in the Tomb of the Giants, so you no longer have to worry about enemies reviving.
After the Pinwheel fight, search the room for a ladder. Climb it to emerge in the Tomb of the Giants. Follow the twinkling lights, but take it slowly, for it is extremely easy to lose your footing and fall to your death. Aside from falling, your biggest threat in the dark are Giant Skeletons. They take up a lot of space on these narrow cliffs and can easily push you off. Use magic or Pyromancy if you have it, otherwise attack hard when the opportunity arises – the longer you spend engaged, the higher the chance you’ll fall off the edge.
If you're in the dark, look for glowing eyes. They are the only way to spot a Giant Skeleton at a distance without a decent light source.
Continue descending until you spot the NPC Patches. Before talking to him, however, turn left and look for a ladder leading down to a bonfire. Rest there, then speak to Patches.
If you walk over to the green light behind him, Patches will kick you into the pit. Here you will find a Skull lantern among the corpses and, if you go right, the NPC Rhea. Watch out for her bodyguards; they have become hollow and will attack you in the pit. Defeat them and speak once more to Rhea for the Replenishment Miracle. She will now head back to the shrine in the Undead Parish. Be warned that if you do not kill Petrus (who hangs out near the elevator in Firelink Shrine) relatively soon, he will eventually murder Rhea. Since you can join the Way of the White by speaking to either NPC, you could conceivably buy all the miracles you need from Petrus and kill him to protect Rhea, who sells her own unique set of miracles.

Another enemy found down here is the Skeleton Pillar. Don’t get too close to these slow moving columns. Your best bet is to get a strike in and back off, repeating as necessary.
Find the ladder and escape the pit. When you reach the top of the ladder, strike the wall to reveal the exit. Turning right leads you back to the bonfire, Patches, and eventually, the area boss. Left leads further into the tomb and the Divine Ember. Rest up at the bonfire if needed, reconcile with Patches (if you want to), then head back here and go left.
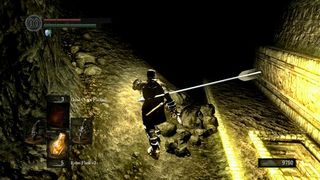
You’ll notice a small hole to your right leading into a small tomb and a ledge leading up to your left. If you fall into the tomb, you can find the Large Divine Ember – but not before defeating five Giant Skeletons. Take out as many as you can from the high ledge, then jump down and pray.
Climb out of this tomb and head up the aforementioned ledge. There will be two archers shooting at you and a normal Giant Skeleton to deal with. You can lure the Giant Skeleton over to where it is safer instead of risking an arrow in the knee (derp). At the end of the path you’ll find a long ladder. Once you reach the top, be prepared to take on two more Giant Skeletons.
Once you climb out of this small tomb, head up the rocky ledge in front of you. This leads back to the beginning of the level. Drop down and return to Patches. To his right, you’ll notice blue lights running along the right wall. This is the path to the boss, so let’s go.
Jump to Section
- Firelink Shrine
- Undead Burg part 1
- Undead Burg part 2
- Undead Parish part 1
- Undead Parish part 2 (First Bell)
- (OP) Grinding for Souls & Finding Goodies in Darkroot Garden
- Lower Undead Burg
- (OP) Returning to the Undead Asylum
- The Depths
- Blighttown
- (OP) Exploring Blighttown's Swamp
- (OP) Undead Dragon & Valley of the Drakes
- Quelaag's Domain (Second Bell)
- (OP) Moonlight Butterfly & the Divine Ember
- (OP) Darkroot Basin, the Hydra, and Dusk
- Sen's Fortress part 1
- Sen's Fortress part 2
- Anor Londo part 1
- (OP) Painted World of Ariamis part 1
- (OP) Painted World of Ariamis part 2
- Anor Londo part 2
- Return to Firelink Shrine & Placing the Lordvessel
- Sif and the Darkroot Garden
- New Londo Ruins
- The Catacombs
- Tomb of the Giants part 2
- (OP) Dark Sun Gwyndolin & the Blade of the Darkmoon Covenant
- Duke's Archives
- Crystal Cave
- Demon Ruins part 1
- Demon Ruins part 2
- (OP) Great Hollow & Ash Lake
- Lost Izalith
- (OP) Sanctuary Garden (New Content)
- (OP) Oolacile Sanctuary & Royal Wood (New Content)
- (OP) Oolacile Township (New Content)
- (OP) Chasm of the Abyss (New Content)
- (OP) Black Dragon Kalameet (New Content)
- Kiln of the First Flame & Gwyn, Lord of Cinder
Current page: Dark Souls: Tomb of the Giants Part 1
Prev Page Dark Souls: The Catacombs Next Page Dark Souls: Tomb of the Giants Part 2Sign up to the 12DOVE Newsletter
Weekly digests, tales from the communities you love, and more
Dark Souls Remastered seamless co-op is officially coming from the creator behind the same Elden Ring mod, and it's set to include everything from PvP to scaling
There's a whole world of Dark Souls-style lore hidden in this series of dress-up games, and I bet you can't tell which is which

